Add License
Only perform if upgrading to a SovLabs 2019.x plug-in version for the FIRST time
-OR- if you obtained a new SovLabs License Key
SKIP this entire 'Add License' section if upgrading within SovLabs 2019.x plug-in versions
-OR- if you obtained a new SovLabs License Key
SKIP this entire 'Add License' section if upgrading within SovLabs 2019.x plug-in versions
Delete Old SovLabs License
Delete previous SovLabs License key(s) if upgrading or applying a new license key
Steps
- Login to the desired vRA tenant (e.g. sov_admin@vsphere.local user)
- Click on the Deployments tab
- Click on SovLabs License filter
- Select the SovLabs license key and go to Actions and click Delete License
- Submit the form
- Under Requests in vRA, the request should complete successfully.
- Repeat if you have multiple licenses
Add SovLabs 2019.16.0 License
Please note that the SovLabs 2019.16.0 Plug-in needs a 2019.x license key.
| Type | Step | Location |
|---|---|---|
| License with NO Activation | Add License with no Activation | vRA Tenant |
If prompted to activate your license key
The email received from SovLabs will note if license activation is required or not
| Type | Step | Location | |
|---|---|---|---|
| Single vRO with Activation | Add License with Activation | vRA Tenant | Will note in email that the license key requires activation |
| Clustered vROs with Activation | Add Licenses in vRO with Activation | vRO Client | Will note in email that the license key requires activation |
No Activation
Steps
- Login to the desired vRA tenant (e.g. sov_admin@vsphere.local user)
- Click on the Catalog tab
- Click on the catalog item: Add License - SovLabs Modules
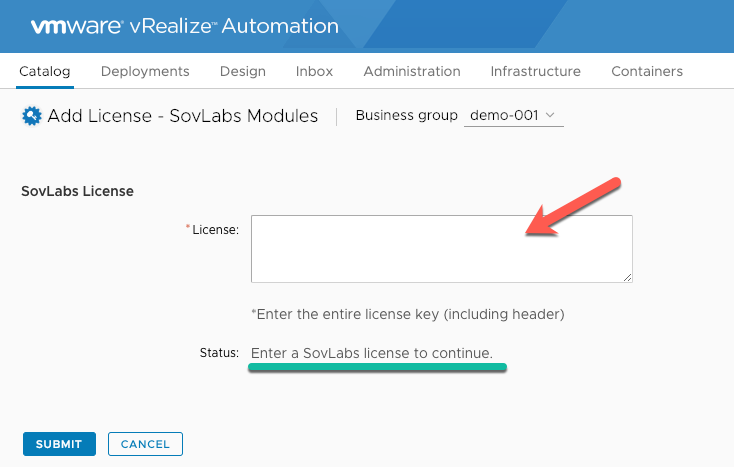
- Fill out the form (see Add License Form below)
- After updating the License Key field, please click outside of the textarea on the form to trigger a refresh
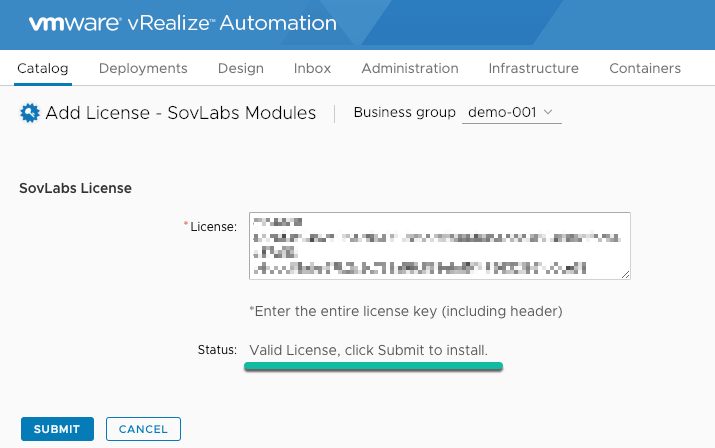
- The Status field should be: Valid License, click Submit to Install
- Click Submit
- Under Deployments in vRA, the request should complete successfully.
- Once the SovLabs license has been added, SovLabs vRA Catalog Item(s) will appear for the modules licensed (may take up to 10 minutes for all items to appear)
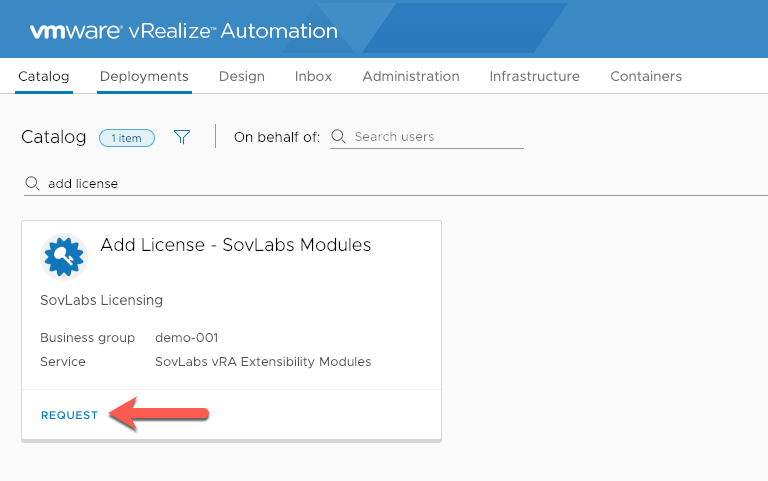
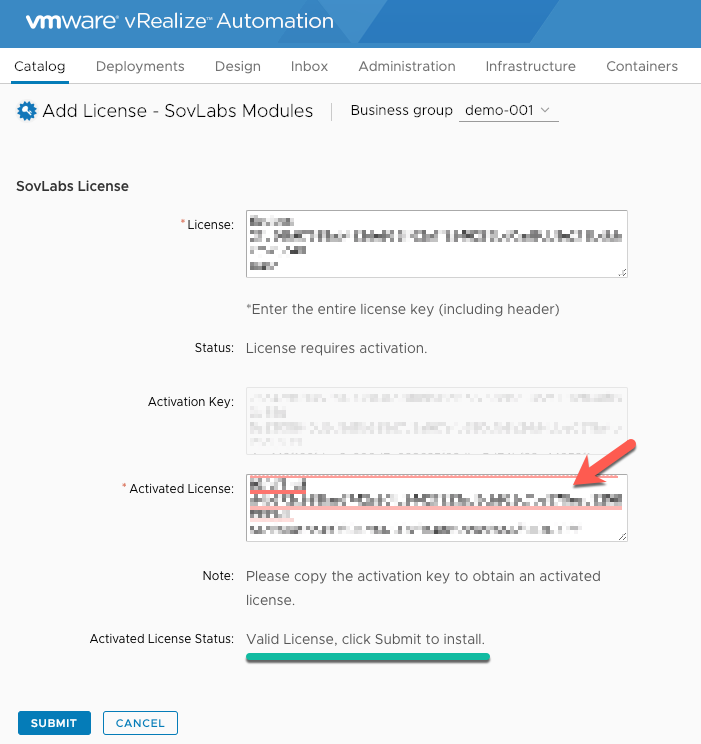
Add License Screenshot
Add License - SovLabs Modules
Add License Form
| Field | Value |
|---|---|
| License key | Copy & paste the entire SovLabs license file provided (including the header) |
Add License 1 Screenshot
Add License 1
Submit Screenshot
Add License 2
View Progress
To watch the progress of the license install workflow:
- Login to the vRO client
- In the Workflows tab, go to SovLabs > License > vRA ASD > Add License
- A vRO workflow token should appear and complete successfully.

Add License vRO workflow Screenshot
Add License vRO workflow
Single vRO with Activation
Steps
- Login to the desired vRA tenant (e.g. sov_admin@vsphere.local user)
- Click on the Catalog tab
- Click on the catalog item: Add License - SovLabs Modules
- Paste the SovLabs License Key obtained into the License Key field
- After updating the License Key field, please click outside of the textarea on the form to trigger a refresh
- The form will refresh and present an updated view with an Activation Key in a readonly textarea
- Copy the Activation Key presented
- Go to https://license.sovlabs.com
- Paste the Activation Key, check the CAPTCHA and click Submit
- Copy the Activated License from https://license.sovlabs.com
- Paste the Activated License back in the form
- After updating the Activated License field, please click outside of the textarea on the form to trigger a refresh
- The Activated License Status field should be: Valid License, click Submit to Install
- Click Submit
- Under Deployments in vRA, the request should complete successfully.
- Once the SovLabs license has been added, SovLabs vRA Catalog Item(s) will appear for the modules licensed (may take up to 10 minutes for all items to appear)
Add License Screenshot
Add License - SovLabs Modules
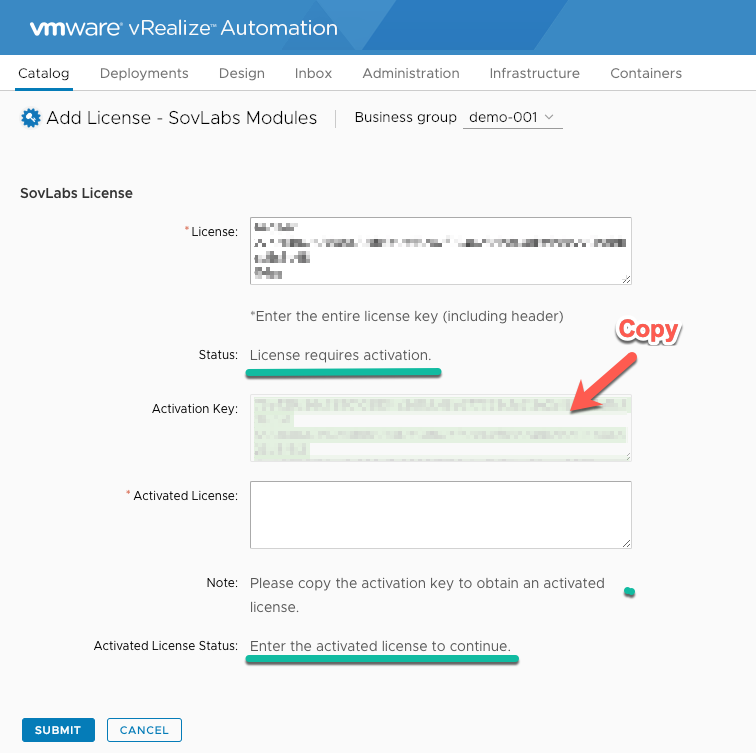
Copy Activation Key Screenshot
Copy Activation Key

Activate Key Screenshot
Activate Key
Add License Form
| Field | Value |
|---|---|
| License key | Copy & paste the entire SovLabs license file provided (including the header) |
| Activation Key | Copy & paste the Activation key to https://license.sovlabs.com |
| Activated License | Copy & paste the Activated license back to the form |
Activated License Screenshot
Activated License
View Progress
To watch the progress of the license install workflow:
- A vRO workflow token should appear and complete successfully.
Add License vRO workflow Screenshot
Add License vRO workflow
Clustered vROs with Activation
- Login to the first vRO node
- Click on the Workflow tab
- Navigate to: SovLabs > License > vRA ASD
- Right-click on the vRO workflow Add License and click Start workflow
- Paste the SovLabs License Key obtained into the License Key field
- After updating the License Key field, please click outside of the textarea on the form to trigger a refresh
- The form will refresh and present an updated view with an Activation Key in a readonly textarea
- Copy the Activation Key presented
- Go to https://license.sovlabs.com
- Paste the Activation Key, check the CAPTCHA and click Submit
- Copy the Activated License from https://license.sovlabs.com
- Paste the Activated License back in the form
- After updating the Activated License field, please click outside of the textarea on the form to trigger a refresh
- The Activated License Status field should be: Valid License, click Submit to Install
- Click Submit
- Once the SovLabs license has been added, SovLabs vRA Catalog Item(s) will appear for the modules licensed (may take up to 10 minutes for all items to appear)
- Repeat Steps 1-15 for all remaining vRO Clustered Nodes
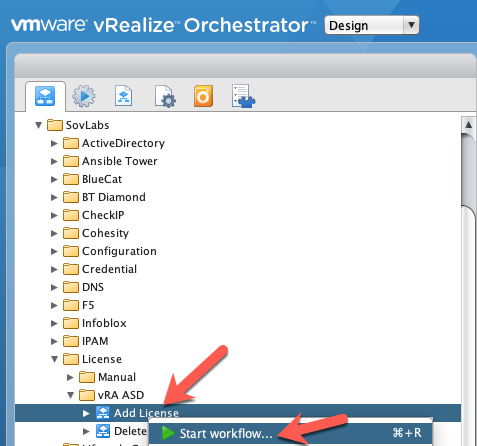
Add License in vRO Screenshot
Add License in vRO

Copy Activation Key in vRO Screenshot
Copy Activation Key in vRO
Activate Key Screenshot
Activate Key
Add License Form
| Field | Value |
|---|---|
| Tenant | Type in the vRA tenant name |
| vRA Business Group | Type in the vRA Business Group for SovLabs |
| License key | Copy & paste the entire SovLabs license file provided (including the header) |
| Activation Key | Copy & paste the Activation key to https://license.sovlabs.com |
| Activated License | Copy & paste the Activated license back to the form |

Activated License to vRO Screenshot
Activated License to vRO
View Progress
To watch the progress of the license install workflow:
- A vRO workflow token should appear and complete successfully.
Add License vRO workflow Screenshot
Add License vRO workflow
Results
After the license is successfully added, SovLabs Catalog Items and SovLabs vRA Event Broker Subscriptions will appear/generate

SovLabs vRA Catalog Items Screenshot
SovLabs vRA Catalog Items
Disable SovLabs DNS Subscriptions
It is recommended once the SovLabs plug-in installation is completed to Disable DNS subscriptions until a ‘Proper’ DNS configuration is created.
Two options are available.
Disable SovLabs DNS vRA EBS
- Login to vRA tenant
- Go to Administration > Events > Subscriptions
- Select and Unpublish the SovLabs_DNS_machineBuilding subscription
- Select and Unpublish the SovLabs_DNS_machineDisposing subscription
*These will be restored any time the SovLabs plug-in is updated
Attach a vRA Custom Property to vRA Endpoint(s)
- Create the vRA Custom property:
SovLabs_DisableDNSwith the valuetrue. - Apply to all the vRA tenant > Infrastructure > Endpoint(s) attached to vRA.
*This will prevent the DNS subscriptions from executing.
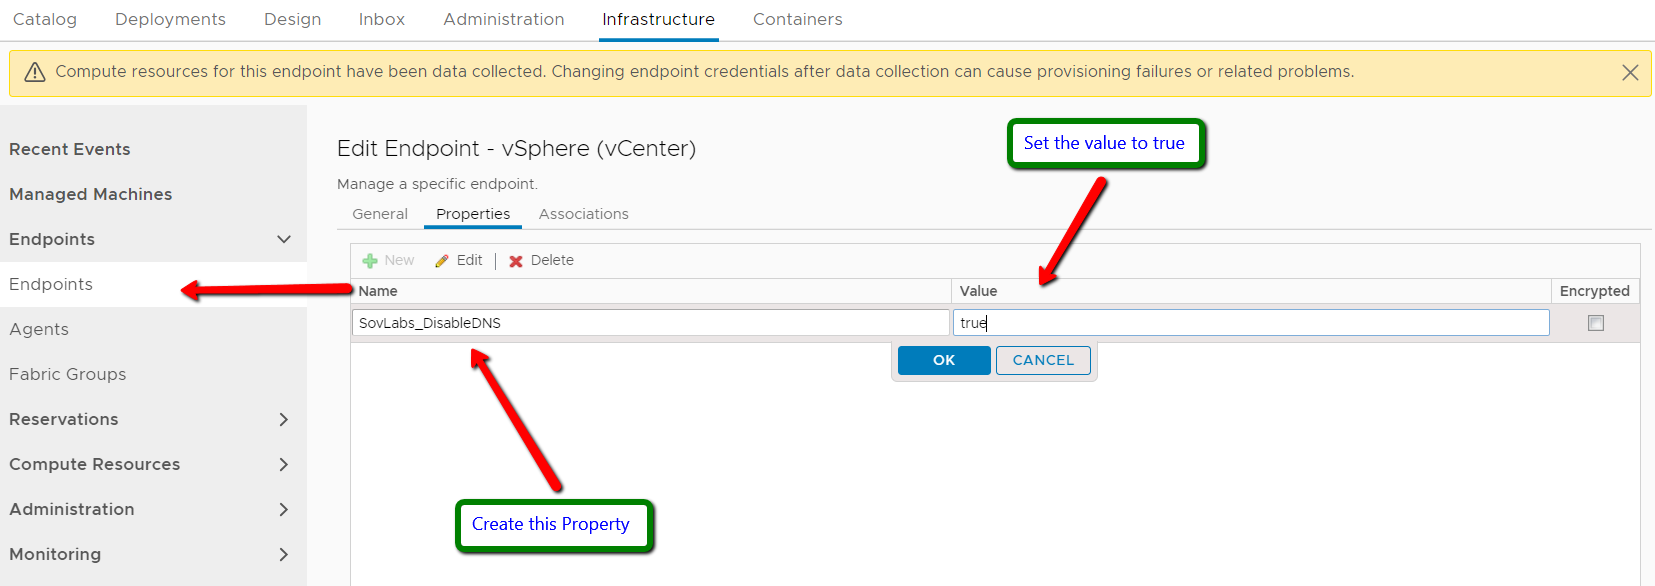
SovLabs Disable DNS Screenshot
SovLabs Disable DNS